Sunday 15 January 2017

AEM Touch UI Dialog Validation

Use Case : Validate a text field for a valid Pattern Text.

Solution:

1. Create touch ui component as shown in the below diagram


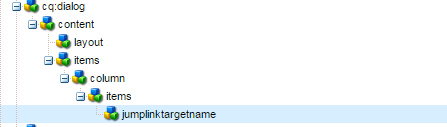
2. Make sure to use a unique id as property to access that in the JS for validation as shown below

3. Now create a clientLibs folder and add required JS validation files and add cq.authoring.dialog as categories. This will load the JS when a dialog is loaded.

Sample JS File:

(function (document, $) {
    'use strict';

    $(document).on("click", ".cq-dialog-submit", function (e) {
        var _element = $('#relatedjumplink').val();
        var patterns = {
emailadd: /^([a-z\d!#$%&'*+\-\/=?^_`{|}~\u00A0-\uD7FF\uF900-\uFDCF\uFDF0-\uFFEF]+(\.[a-z\d!#$%&'*+\-\/=?^_`{|}~\u00A0-\uD7FF\uF900-\uFDCF\uFDF0-\uFFEF]+)*|"((([ \t]*\r\n)?[ \t]+)?([\x01-\x08\x0b\x0c\x0e-\x1f\x7f\x21\x23-\x5b\x5d-\x7e\u00A0-\uD7FF\uF900-\uFDCF\uFDF0-\uFFEF]|\\[\x01-\x09\x0b\x0c\x0d-\x7f\u00A0-\uD7FF\uF900-\uFDCF\uFDF0-\uFFEF]))*(([ \t]*\r\n)?[ \t]+)?")@(([a-z\d\u00A0-\uD7FF\uF900-\uFDCF\uFDF0-\uFFEF]|[a-z\d\u00A0-\uD7FF\uF900-\uFDCF\uFDF0-\uFFEF][a-z\d\-._~\u00A0-\uD7FF\uF900-\uFDCF\uFDF0-\uFFEF]*[a-z\d\u00A0-\uD7FF\uF900-\uFDCF\uFDF0-\uFFEF])\.)+([a-z\u00A0-\uD7FF\uF900-\uFDCF\uFDF0-\uFFEF]|[a-z\u00A0-\uD7FF\uF900-\uFDCF\uFDF0-\uFFEF][a-z\d\-._~\u00A0-\uD7FF\uF900-\uFDCF\uFDF0-\uFFEF]*[a-z\u00A0-\uD7FF\uF900-\uFDCF\uFDF0-\uFFEF])\.?$/i
};
        if(!patterns.emailadd.test(_element)){
            $(window).adaptTo("foundation-ui").alert("Close", "Invalid Input Id");
           e.preventDefault();
        }
    });


})(document, Granite.$);


Sunday 11 December 2016

Google Maps Integration with AEM Page

Ever wondered how does entering the pin code or address on any mobile application gives out the google map of the location !!
Here you go... It's a simple integration with Google Maps API. Yes!! this can be done on any platform easily. Take a look in the below screenshot how does it appear to the end user.


Here's a example to it using the pin code as the user data and give him the location on the map.

Step 1:
Create a component and add the following code which generates a form on the page with a submit button.
Fields on the dialog can be the title you want to give for the map which is a simple text widget.

<div class="container">
   <h2>Search stores</h2>
<label for="Enterzipcode">Enter store zipcode</label>
        <input id="zipCode" type="text">
        <input type="hidden" id="miles10" name="miles" value="${properties.miles}" />
        <button class="btn btn-info" id="submitZip" onClick=getLocation() >Submit</button>

    <div id="map-canvas">
    </div>
</div>


Step 2:
Create a project specific clientLib structure. And a folder to add all the js files required.
Create a file named geomap.js and add the below code.

<script>
function getLocation(){
    var zipcode = $('#zipCode').val();
    $.ajax({
       url : "http://maps.googleapis.com/maps/api/geocode/json?components=postal_code:"+zipcode+"&sensor=false",
       method: "POST",
       success:function(data){
           latitude = data.results[0].geometry.location.lat;
           longitude= data.results[0].geometry.location.lng;
   initMap(latitude,longitude)
       }
    });

};
   
function initMap(latitude,longitude) {

        var city = {lat: latitude, lng: longitude};
        var map = new google.maps.Map(document.getElementById('map-canvas'), {
                      zoom: 10,
                      mapMaker: true,
                      rotateControl: true,
                      center: city
                  });
        var marker = new google.maps.Marker({
                    position: city,
                    map: map
                 });
      }
</script>
<script async defer src="https://maps.googleapis.com/maps/api/js?key=AIzaSyChxoSa2XZNTPZHs1UUuA24vfEAZhm3JRc">
</script>

Make sure the above google api key is generated and added in the js file.


Step 3:
Can add the custom css to the map section which fits on the site page. Below is the sample css added to the map.

<style>
       #map-canvas {
               height: 400px;
               width: 100%;
       }
</style>

Output:

On the initial page load , a form is seen with a input field for pin code and a submit button.


On entering the pin code and click on " submit ", an ajax call will bring in the map of the entered pin code as below.

The map comes with controls like Zoom in and Zoom out.

Wednesday 8 June 2016

AEM Tagging Framework

Tags : cq:Tag Node Type

The declaration of a tag is captured in the repository in a node of type cq:Tag.
A tag can be a simple word (e.g. sky) or represent a hierarchical taxonomy (e.g. fruit/apple, meaning both the generic fruit and the more specific apple).
Tags are identified by a unique TagID.

Tag Characteristics

  • node type is cq:Tag
  • node name is a component of the TagId
  • the TagId always includes a namespace
  • optional jcr:title property (the Title to display in the UI)
  • optional jcr:description property
  • when containing child nodes, is referred to as a container tag
  • is stored in the repository below a base path called the taxonomy root node.

TagID

A TagID identifies a path which resolves to a tag node in the repository.  
Typically, the TagID is a shorthand TagID starting with the namespace or it can be an absolute TagID starting from the taxonomy root node.
The TagID consists of a namespace followed by the local TagID.  Container tags have sub-tags that represent a hierarchical order in the taxonomy. Sub-tags can be used to reference tags same as  any local TagID.   For example tagging content with "fruit" is allowed, even if it is a container tag with sub-tags, such as "fruit/apple" and "fruit/banana".
The taxonomy root node is the base path for all tags in the repository.  The taxonomy root node must not be a node of type cq:Tag

Resolving TagIDs

The following table shows some sample TagIDs, their elements, and how the TagID resolves to an absolute path in the repository :

TagIDNamespaceLocal IDContainer tag(s)Leaf tagRepository
Absolute tag path
dam:fruit/apple/braeburndamfruit/apple/braeburnfruit, applebraeburn/etc/tags/dam/fruit/apple/braeburn
color/reddefaultcolor/redcolorred/etc/tags/default/color/red
skydefaultsky(none)sky/etc/tags/default/sky
dam:dam(none)(none)(none, the namespace)/etc/tags/dam
/etc/tags/category/carcategorycarcarcar/etc/tags/category/car

Sunday 5 June 2016

Run Modes


Run modes allow you to tune your AEM instance for a specific purpose; for example author or publish, test, development, intranet or others.

Installation Run Modes

Installation (or fixed) run modes are used at installation time and then fixed for the entire lifetime of the instance, they cannot be changed.

Installation run modes are provided out-of-the-box:
  • author
  • publish
  • samplecontent
  • nosamplecontent
These are two pairs of mutually exclusive run modes; for example, you can:
  • define either author or publish, not both at the same time.
  • combine author with either samplecontent or nosamplecontent (but not both).

Customized Run Modes

You can also create your own, customized, run modes. These can be combined to cover scenarios such as:
  • author + development.
  • publish + test.
  • publish + test + golive.
  • publish + intranet.
There are two mechanisms for setting standard and environment specific run mode for your instance:

To set up standard run mode Use the naming convention:
  • cq-<run-mode>-<port-number>. For example, set a standard run mode by naming the jar file cq-author-4502 or cq-publish-4503.
To set up environment specific run mode there are two methods:
  • Open <cq-installation-dir>/crx-quickstart/launchpad/sling.properties.
  • Add the following properties (following example is for author, test, uk):
  • sling.jcrinstall.folder.name.regexp=.*/(install|config)? 
  • sling.run.modes=author,test,uk .
  • In above case config.author.test.uk will get picked up (Or whatever with maximum match).
Configuration values for the run modes are saved in the repository. You can store all configurations in one repository as the run mode is indicated by a suffix on the folder name; for example:
  • config, applicable for all run modes.
  • config.author, used in author run mode.
  • config.publish, used in publish run mode.
  • config.<standard-run-mode>.<environment-specific-mode>, used in the applicable run mode.

Starting CQ with a specific run mode

If you have defined configurations for multiple run modes then you need to define which is to be used upon startup. There are several methods for specifying which run mode to use; the order of resolution is:
  • sling.properties file.(Edit <cq-installation-dir>/crx-quickstart/conf/sling.properties)
  • -r option.(start the jar with java -jar cq-56-p4545.jar -r dev)
  • system properties (-D).(A system property in the start script can be used to specify the run mode. -Dsling.run.modes=publish,prod,us)
  • Filename detection (cq5-<run-mode>-p<port-number>).
To check the runmode:

http://adobeaem-learneasycodeeasy.blogspot.in/search/label/runmode.

Saturday 4 June 2016

Sling Adapters


Sling AdaptTo :


Sling offers an Adapter pattern to conveniently translate objects that implement the Adaptable interface. This interface provides a generic adaptTo() method that will translate the object to the class type being passed as the argument.

For example to translate a Resource object to the corresponding Node object, you can simply do:

Example : Node node = resource.adaptTo(Node.class);

Use Cases :

There are the following use cases:


  • Get implementation-specific objects.For example, a JCR-based implementation of the generic Resource interface provides access to the underlying JCR Node.
  • Shortcut creation of objects that require internal context objects to be passed.For example, the JCR-based ResourceResolver holds a reference to the request's JCR Session, which in turn is needed for many objects that will work based on that request session, such as the PageManager or UserManager.
  • Shortcut to services.A rare case - sling.getService() is simple as well.

How it works :

There are various ways that Adaptable.adaptTo() can be implemented:
  • By the object itself; implementing the method itself and mapping to certain objects.
  • By an AdapterFactory, which can map arbitrary objects.
  • The objects must still implement the Adaptable interface and must extend SlingAdaptable (which passes the adaptTo call to a central adapter manager).
  • This allows hooks into the adaptTo mechanism for existing classes, such as Resource.

Reference : Sling Adapters.


Sling Cheatsheet


This tutorial is to learn how Apache Sling Resource Resolution is done in AEM.

URL Decomposition :


URL – http://localhost:4502/cf#/content/aemTutorials/sightlyPage.test.html/a/b?x=12

Protocol: http
Host: localhost:4502
Content path : content/aemTutorials/sightlyPage
Selector(s) : .test
Extension : html
Suffix : a/b
Param : x=12


Sling Resource Resolution – Mapping URL to Respective JCR Node :


Step-1: Double click on a page in siteadmin , to open respective page in browser.

Step-2-3-4-5:  Analyse the URL /contents/aemTutorials/sightlyPage it is known as content path.

  • The /content path refers to the path of content folder in crx de.
  • /aemTutorials refers to the package under contents folder.
  • /sightlyPage refers to our page that we have created under siteadmin. jcr:content of sightlyPage contains a property sling:ResourceType. Which tells sling where our component is located. As shown in above figure it is at training/components/myComponent , means sling needs to check for myComponent under /apps folder.
Step-6: Analyse selector and extension  test.html.
  • Sling appends the selector and extension after the component name i.e myComponent.test.html If it found this component then it render it else it drops the extension and search again.
Note:- Sling decides rendering of script on the basis of selector + extension . First priority goes to selector, if no selector is available then priority goes to extension.

Now if we double click our page http://localhost:4502/cf#/content/sample/testing.html  then by default myComponent.jsp script will be called because here .html is an extension not selector .

Between jsp and html first priority goes to jsp as by default a component is linked to jsp at the time of creation.

So the final priority order will be myComponent.html.jsp–>html.jsp–>myComponent.jsp –>myComponent.html